
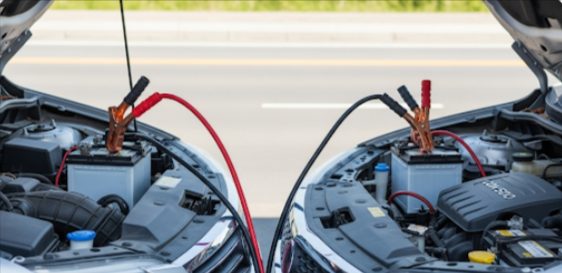
As Alex’s car refused to start on a desolate roadway in the waning dusk light, the only thing on his mind was Jumper Cable Setup. The situation seemed dismal because there was no mechanic in sight and the battery was dead, but then a friendly stranger stopped and smiled confidently to offer assistance.
Alex understood that the straightforward yet effective jumper cable configuration wasn’t only about resurrecting a dead automobile; it was also about how little connections might give seemingly hopeless situations new life when they joined the red and black clamps in the proper order. The instruction of how to hook up a jumper cable correctly that evening evolved into more than simply roadside information; it became a memory of assistance, trust, and unanticipated friendship.
Jumper cables: what are they?
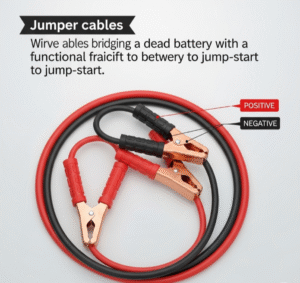
Let’s start with the fundamentals, friend. Thick, insulated wires with sturdy alligator clips (clamps) on both ends are known as jumper cables. When the battery is too weak to start your automobile on its own, they are utilized to transfer power from a functional battery to a dead battery.
A decent set of jumper cables should have robust, rust-proof clamps for safe connections be at least 10 to 20 feet long and be constructed with thick gauge wires (four or six gauge is ideal).
When Are Jumper Cables Necessary?
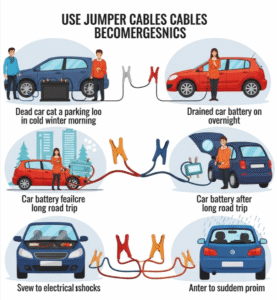
Hi Reader, when your battery dies, usually from keeping lights on all night, cold weather & an old battery, you all require jumper wires. Jumper cables and a willing assist with a running automobile are your greatest friends if your car won’t start and you hear a clicking sound or see dim lights.
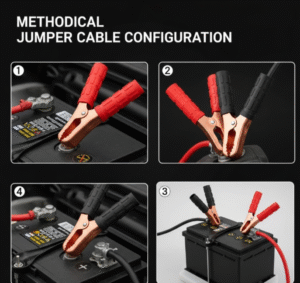
Methodical Jumper Cable Configuration
Let’s now go over how to securely set up and utilize your jumper cables:
1. Park sensibly
Make sure the cars are not touching and park the operating car near to the dead car, generally front to front. Turn off both ignitions and apply both parking brakes.
2. Find the Batteries
Locate the batteries by opening both hoods. Determine which terminals are positive (+) and negative (-). The negative terminal is typically marked in black with a minus sign, whereas the positive terminal is frequently covered in red or has a plus sign.
3. Disentangle and Examine
Untangle the wires. Verify that they are not damaged or torn. To prevent them from being stuck in engine components, lay them out.
4. Fasten the Positive Red Clamps
Attach a single red clamp to the dead battery’s positive (+) connector.
Attach the other red clamp to the good battery’s positive (+) connector.
5. Fasten the Negative Black Clamps
Attach a single black clamp to the good battery’s negative (-) connector.
Attach the other black clamp to a bolt or bracket or other unpainted metal component of the deceased car’s engine block. This lessens the chance of sparking close to the dead battery.
6. Turn on the operational vehicle
The working car’s engine should be started and allowed to run for a few minutes. The dead battery gains some charge as a result.
7. Try to Get the Dead Car to Start
Try starting the dead automobile a few minutes later. Wait another two to three minutes and try again if it doesn’t start. To build up the charge, keep both cars running for a few minutes after it starts.
8. Unplug the cables in the opposite order.
Carefully remove the clamps in the opposite order that you attached them:
- From the previously dead car’s grounded metal, remove the black clamp.
- From the negative connection of the operational battery, remove the black clip.
- From the positive connection of the operational battery, remove the red clip.
- Lastly, take the red clamp off of the positive terminal of the recharged battery.
9. Turn on the engine
To allow the alternator to recharge the battery, keep the restored vehicle running for at least 20 to 30 minutes or take it for a drive.
Safety Advice for Installing Jumper Cables
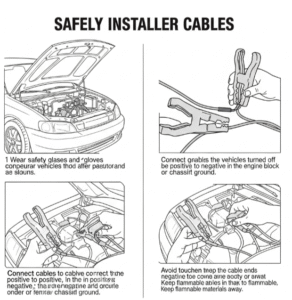
Safety comes first, my friend. Here are several important safety measures:
- When using a battery, make sure the clamps never come into contact with one another.
- Batteries release gasses that might catch fire, so avoid smoking lighting matches next to them.
- Read your car’s handbook at all times.
- Verify the terminals again to make sure the positive and negative clamps are not crossed. Certain vehicles, such as hybrids, can need certain protocols.
What Happens If Jump-Starting Is Ineffective?
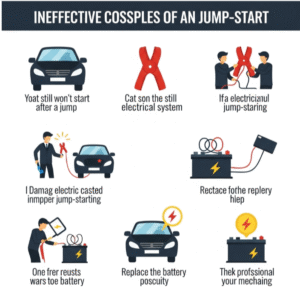
If your car still won’t start, there may be a more serious problem, such as a dead battery that won’t charge, corroded terminals or a broken alternator. The best course of action in this situation is to contact an expert or have your battery checked and replaced if necessary.
Concluding remarks
Hello buddy! one of the fundamental skills that every driver should possess is the ability to set up jumper wires. You may save costly towing costs and hours of worry by learning it in a matter of minutes. You all always be ready for unexpected dead batteries if you have a decent set of jumper wires in your trunk.
Read more: setup linksys extender ❤️
10 FAQ’S:
What is the purpose of jumper cables?
car with a dead battery can be jump-started by connecting it to a functioning battery in another automobile using jumper wires.
What is the ideal length for jumper cables?
To make it easier to reach between two cars, jumper wires should ideally be between 10 and 20 feet long.
The positive and negative clamps are what color?
Typically, the negative clamp is black, while the positive clamp is red.
On the dead automobile, where do I attach the black clamp?
Instead of connecting it straight to the battery, attach it to an exposed metal section of the vehicle's engine block.
Before starting the dead automobile, how long should I run the operating one?
Before attempting to start the dead automobile, let the operating car run for two to five minutes.

